<< Back to the Makerspace main page
In our school, the xTool M1 Hybrid Laser & Blade Cutter is primarily utilized for its laser cutting capabilities. This laser cutter does precise cutting and has intricate engraving capabilities. The dual laser technology of the xTool M1 can cut up to 10mm thick wood or 3mm acrylic in a single pass! It can do engravings on many different materials.
Text guide
- Activate the laser cutter and the fan by turning on the power switch located behind the laser cutter.
- Open the xTool Creative Space software on the computer next to the Laser Cutter. You can watch this video to get help with the editing software.
- Insert the material you want to cut or engrave into the laser cutter.
- Create och import a picture you want to cut or engrave with the tools in the left menu.
- Select the Laser flat processing mode in the settings menu to the right.
- Select material. If you find your material as a predefined material, the thickness and other settings will be automatically configured.
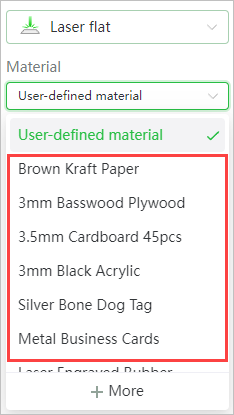
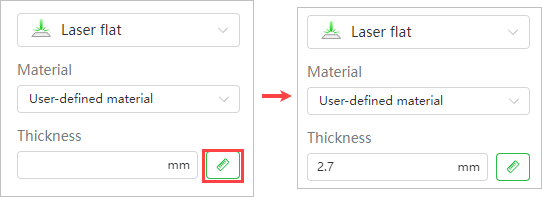
- If you do not find your material in the list you can measure the thickness automatically or manually.
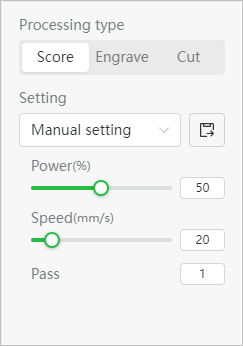
- Set processing parameters for the object to be processed. Different processing methods
When you Score a graphic, only the outline of it will be processed.
When you Engrave a graphic, the closed area within the outline will be engraved.
When you Cut a graphic, the graphic will be cut out through its outline.
NOTE! If you are using a predefined material, do not alter the values. If you are using a material that is not predefined, it might be beneficial to test on a small area and adjust the power and speed values based on the test.
- When you have finished editing klick the green Process button down to the right.
- If the picture you want to cut, score and/or engrave looks ok, press the Start button.
- Press the button on xTool M1 to start processing.
- Wait for the processing to complete.
Video guide
TIMESTAMPS in the video
03:15 – Select your laser engrave/cut mode
04:28 – Select your material
04:25 – Place your material
05:26 – Import an image
05:54 – Settings
06:58 – Start laser engraving/cutting process